Skip to content
  Once in a lifetime deal →


During my early freelancing days, I once googled invoice templates and found a nice one. When I proceeded to fill in my project details and all, that platform asked me to pay! But with Excel, you can do it for free.
After reading this article, you will learn how to make an invoice in Excel in 2 ways: using a free invoice template and making a customized one from scratch. Also, there are some automated paid options for busy freelancers.
How to Make an Invoice in Excel Using Built-in Invoice Templates
Excel invoice templates are kind of perfect for when you’re figuring things out. You’re not committing to expensive software, you’re not building something from scratch at midnight, you’re just using what’s already there.
If you need to send an invoice this week, Excel’s got templates ready to go. They work on desktop Excel and Microsoft 365 online.
Step 1: Open Microsoft Excel
First things first, open Microsoft Excel on your computer.
If you use a Windows-operated PC or laptop, use the search bar and type “Microsoft Excel”. Click to open it.
On macOS, press Command+Spacebar, and type Microsoft Excel—Double-click on it to open.
If you don’t have Microsoft Office Installed, you can use Microsoft 365, which is a web version of Microsoft Office with the same functionalities and features. You will need a Microsoft account.
Step 2: Search Invoice Templates in Excel
Open Excel and click File → New. In the search bar, type invoice and hit enter.
You’ll see a gallery of invoice templates. Some are minimal, some are colorful. Pick one that feels right—you can always switch later if it doesn’t work out.
Step 3: Choose an Invoice Template
Templates usually come in three styles:
- Service Invoice – For billing hours or project work (consulting, design, writing)
- Sales Invoice – For selling products with quantities and prices
- Simple Invoice – Clean format that works for anything
Not sure? Go with the simple invoice. You can’t go wrong.
Step 4: Customize Your Invoice Template
Click on a template to open it. Now make it yours.
Add Your Business Details
Replace the placeholder text at the top with your business name, address, phone, and email. This is what clients see first, so double-check spelling.
Insert Business Logo (Optional)
Go to Insert → Pictures and add your logo. Resize it to fit the top corner. No logo yet? Skip this—a clean invoice works just fine.
Enter Client Information
Fill in the “Bill To” section with your client’s name and address. You’ll do this fresh for each invoice.
Step 4: Create Invoice Line Items
This is where you list what you’re charging for. The template gives you columns:
- Description – What you did
- Quantity – Hours or units
- Rate – Your price
- Amount – Calculates automatically
Type in your details. The template does the math. Add multiple line items and watch the totals update at the bottom—subtotal, tax, and final total. No calculator needed.
Save Your Template for Reuse
Don’t set up your business info every time. Save it once.
- Save as Template: Go to File → Save As → choose Excel Template (.xltx). Name it “My Invoice Template.”
- Or keep a master copy: Save normally with your business details filled in, but leave client info blank. When you need an invoice, open it and immediately Save As with a new name like: Invoice_ClientName_October2025
Never work in your master copy. Always “Save As” first.
When An Invoice Template Works Best
Excel templates are perfect when you’re sending 5-10 invoices a month. Open, fill out, save as PDF, send. Done in five minutes.
They work offline and sync across devices with Microsoft 365. Great for getting started.
Prefer starting with a ready-made file? Grab free Excel invoice templates that include automatic subtotal, tax, and total calculations and clean, professional formatting. Use these to generate professional invoices in Excel in minutes, then customize logos, colors, and fields to match your brand.
Where does it get tricky? Tracking payments, following up on late invoices, or managing 15+ clients. But for creating professional invoices right now? This gets the job done.
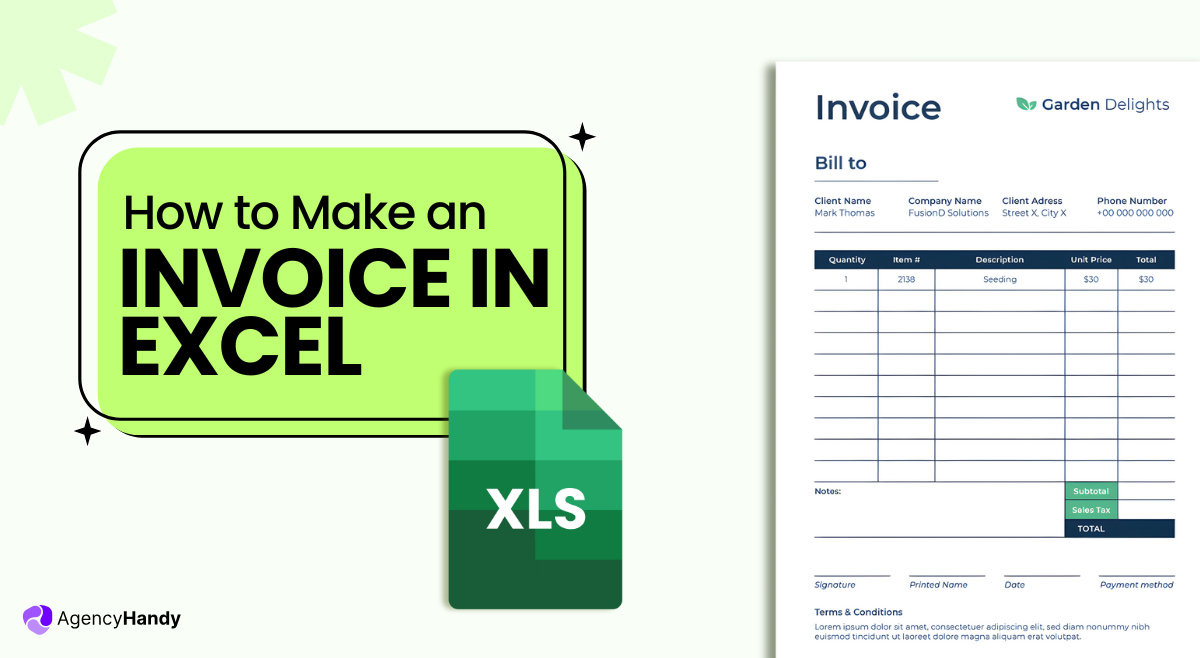
How to Create an Invoice in Excel from Scratch
Maybe Excel’s templates feel too generic for your business. Or you’ve got specific line items that don’t fit the standard format. Building your own invoice from scratch gives you total control—and it’s not as complicated as it sounds.
Step 1: Start with a Blank Excel Workbook
Open Excel and choose Blank Workbook. You’ve got a clean slate ready to become your custom invoice.
Step 2: Set Up Your Invoice Header
Click cell A1 and type your business name. Select cells A1 through D1, or whatever is required to type your business name fully. Then click Merge & Center in the Home tab. This combines the cells and centers your business name. Use a larger font size (18-20 point).
Below that, add your contact details—address, phone, email. Merge cells for each line if the text is long, so nothing gets cut off.
On the right side (pick any 2-3 columns), add:
- Invoice Number
- Invoice Date
- Due Date
Merge cells for labels if needed. Keep the actual numbers in single cells.
For your logo: Insert → Pictures, then resize and place it in the top left corner.
Step 3: Add Client Information
To a convenient place, type “Bill To:” and merge a few cells to make it visible.
Below that:
- Client name (merge cells if long)
- Client company (optional)
- Client address (merge cells—addresses get long)
- Phone number
Merging keeps everything organized instead of text spilling awkwardly into other cells.
Step 4: Create Your Invoice Table with Formulas
Now select 4-5 or more rows and set up these column headers (don’t merge these):
- Description
- Quantity
- Rate
- Amount
Make headers bold. Add a background color if you want.
Now for the formula. Click on cell F11 (your first Line Total cell) and type:
=B11*E11
This tells Excel: multiply the number in B11 (Quantity) by the number in E11 (Price).
Hit Enter. The line total appears automatically.
Now click back on cell F11. See that tiny square in the bottom-right corner of the cell? Click and hold it, then drag down to row 17. Release. The formula copies to all those rows.
Now, when you enter a quantity and price in any row, the line total is calculated automatically. No math needed.
If you write long descriptions in Column A, select that cell and a few empty cells next to it, then click Merge & Center. This gives your text room to breathe.
Step 5: Set Up Calculation Formulas
Below your line items (let’s say row 19), you’ll add subtotal, tax, and total.
For Subtotal:
- Select cells A19 through E19
- Click Merge & Center
- Type “Subtotal”
- Click on cell F19 and type: =SUM(F11:F17)
This adds up all the line totals from rows 11 to 17.
For Tax (if you need it):
- Merge cells A20 through E20
- Type “Tax”
- Click F20 and type: =F19*0.10
The 0.10 means a 10% tax. If you charge 13% tax, use 0.13. If you charge 8%, use 0.08.
For Total:
- Merge cells A21 through E21
- Type “Total”
- Click F21 and type: =F19+F20
This adds the subtotal and tax together.
Done. Your invoice now calculates everything automatically.
How to Make Your Invoice Look Professional
You can make the invoice look like a professional one by doing the following tweaks –
Add Borders
Select your table (headers and line items). Go to Home → Borders → All Borders. This creates clean lines around cells.
Hide the Gridlines
Go to the View tab, uncheck Gridlines.
All those grey lines disappear. Only your table borders remain. Suddenly, it looks like an actual invoice, not a spreadsheet.
Format for Readability
- Make headers bold
- Add a light background color to headers
- Use readable fonts (Arial, Calibri, Helvetica)
- Stick to one or two colors max
Keep it clean and professional.
Adding Payment Details
At the bottom, add:
- Payment due date
- Accepted payment methods
- Bank details or payment info
- Payment terms (“Net 30” or “Due upon receipt”)
Merge cells for this section so text doesn’t look cluttered.
Creating a Simple Invoice Database
At the bottom of your Excel window, right-click next to “Sheet1” and choose Insert → Worksheet. Rename it “Invoice Log.”
Set up columns:
| Invoice # | Date | Client Name | Amount | Status | Payment Date |
Log every invoice you send. Update “Status” to “Paid” when payment comes through. This beats digging through files trying to remember who paid.
Cash Bill Format in Excel
For cash bills (immediate payment), use the same structure but:
- Remove due date (payment is immediate)
- Add “PAID” stamp
- Use “Receipt Number” instead of “Invoice Number”
- Note the payment method as “Cash”
Formulas work the same way. Just adjust the wording.
Saving Your Custom Invoice Template
Once everything’s set—formulas working, formatting clean, gridlines hidden—save it.
File → Save As → name it “Invoice Template – MASTER.”
When you need an invoice, open this file and immediately Save As with a new name: Invoice_ClientName_Date.
Why Build Your Own
This takes 30-40 minutes the first time. But once it’s done, you’ve got an invoice that’s exactly what you need. No extra fields, no weird formatting. Just a clean, professional invoice that does the math and looks the way you want.
Save it, reuse it, move on. You’ve got actual work to do.
How to Create an Invoice in Mac
If you use a macOS device, and don’t have Microsoft Office installed, and you don’t want to purchase it either, you can do it for free in Microsoft 365. It’s a cloud-based web version of Microsoft Office, which is absolutely free.
Go to Microsoft 365 Excel. Open an account if you don’t have any.
Then, proceed following the previously mentioned steps.
Automated Invoice Generation with Agency Handy
So you’ve seen how to make an invoice in Excel—both with templates and from scratch. They work, they’re free, and they get the job done when you’re starting out.
But here’s something worth knowing: if you’re using client management software or a CRM, a lot of them come with built-in invoice features that do all this automatically.
How Agency Handy Invoicing Works
Tools like Agency Handy (that’s us, by the way) generate invoices for you. No Excel file to open, no formulas to set up, no saving multiple versions.
You create an invoice inside the platform, and it:
- Auto-calculates totals and tax
- Saves client details so you’re not retyping addresses
- Tracks payment status automatically
- Sends reminders for overdue invoices
You can customize everything—add your logo, use your brand colors, include custom fields for whatever your business needs. It looks professional because it’s built for client-facing work.
When You Need an Automated Invoice
If you’re sending a couple of invoices a year? Excel is fine. Totally fine.
But if you’re dealing with multiple clients, tracking projects, and sending invoices regularly, having everything in one place starts to make sense. Your client info lives in your CRM, your project details are tracked, and your invoices pull from that data automatically.
No switching between spreadsheets. No forgetting which clients paid. No mental overhead trying to remember if you already invoiced someone.
The Excel vs. Software Question
Excel doesn’t go away just because you use other tools. A lot of freelancers keep using Excel for quick calculations, budget tracking, or one-off projects. It’s flexible and you already know how it works.
The difference is where you spend your time. Excel means you’re managing invoices manually. Software means invoices happen in the background while you focus on actual client work.
Neither is wrong. It just depends on where you are in your business and how much admin work you’re willing to handle.
For now, if Excel works, use Excel. But when it starts feeling like a chore—when you’re spending more time managing spreadsheets than doing billable work—that’s your signal to look at something automated.
Streamline Your Freelance Projects
Excel works when you’re starting out. But if you’re managing multiple clients, you know the struggle. Tracking payments across spreadsheets, following up on invoices manually, switching between tools just to see where a project stands.
Invoicing is just one piece. What you actually need is a system that handles the busy work while you focus on billable hours.
What Agency Handy Does
We built Agency Handy for freelancers and small teams who are tired of using five different tools.
Everything in one place:
- Automated invoicing: Generate branded invoices (your logo, colors), track payments, and send reminders automatically.
- Client portal: Clients see their projects, invoices, and files in one professional space.
- Lead capture: Embed forms on your site, get leads straight into your CRM.
- Project management: Kanban boards to track what’s happening across all your clients.
- Simple CRM: Client details, conversations, and payment history in one spot.
No spreadsheet chaos. No lost emails. No “wait, did they pay me?” moments at 11 PM.
Who It’s For
If you’re sending 2 invoices a year, stick with Excel.
But if you’re dealing with multiple clients, spending hours on admin, or wanting to look more professional—this makes sense.
Freelancer plan: $19/month. $13/month (billed yearly)
Less than an hour of your billable time. And it saves you way more than that.
Conclusion
You’ve got what you need to create professional invoices in Excel—whether using templates or building from scratch. It’s a solid starting point that costs nothing.But when invoicing starts eating your time instead of tracking your earnings, it’s time to automate. Try Agency Handy free for 7 days and see how much faster client management gets when everything’s in one place.